|
|
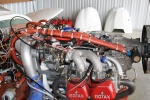
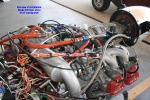
IMG_9569post
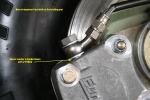
A side view of the installation. Tomorrow I'll be trying to complete the installation of the new control column mounted brake master cylinder. If that is done and I have working brakes, we may try an engine run.
Date: 06/12/2010
Views: 3558
|
|
|
IMG_9570ann
2010 06 12 - Completed the plumbing for the new mechanical fuel pump this morning. Fire shield on all fuel lines. Everything connected in the proper sequence.
Date: 06/12/2010
Views: 3009
|
|
|
|
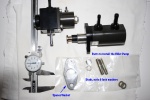
IMG_9558ann
Gathered up the bits needed to install the new pump: spacer/gasket, studs, lock washers & nuts.
Date: 06/06/2010
Views: 3505
|
|
|
IMG_9560ann
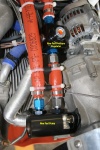
The pump bolted in like it was made for the Rotax. Added hose and fuel pressure regulator. Oops, the regulator will have to be turned so the big grey thing is down, not up. Oh well, just a test fit for now.
Date: 06/06/2010
Views: 2837
|
|
|
|
IMG_9561ann
Overview. Flip the fuel pressure regulator, add firesleeve and put in the AN6-6 nipple to connect the input hose to the input fuel flow meter and the installation will be complete. Maybe later this week when all the bits for the brake and fuel line come
Date: 06/06/2010
Views: 3041
|
|
|
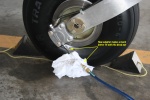
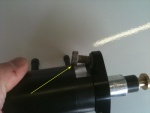
IMG_9562ann
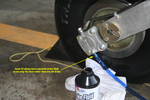
2010 06 06 - Made up an adaptor that fits the bleed and doesn't leak. Began to run fluid into the system. Went up to the master cylinder/reservoir to check on progress. Was I getting bubbles through the bit of fluid it put in back on the 3rd?
Date: 06/06/2010
Views: 2712
|
|
|
|
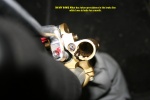
IMG_9556ann
What the heck... There were dead bugs all over the master cylinder. What's going on here. Get out a light, the brake fluid reservoir is full of dead bugs! $#!&$%@%^&*%@$#%%&*&^@$%@%$%$@^#$%^!!!!! Seems that wile I was spending a month
Date: 06/06/2010
Views: 2713
|
|
|
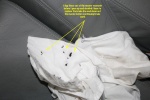
IMG_9557ann
I dug out a bunch, and came to the conclusion that I'm going to have to order a new brake line and clean out the master cylinder before I can continue here. So I went on to the new mechanical fuel pump installation...
Date: 06/06/2010
Views: 2653
|
|
|
|
IMG_9534ann
Date: 06/03/2010
Views: 2634
|
|
|
IMG_9536ann
Date: 06/03/2010
Views: 2834
|
|
|
|
IMG_1195ann
Date: 05/31/2010
Views: 2887
|
|
|
IMG_1193ann
Date: 05/31/2010
Views: 2821
|
|
|
|
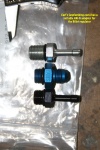
IMG_7558post
I located a couple AN-6 adaptors to replace the hose barbs on the regulator. The adaptors are from Earl's (anplumbing.com), part #AT985006ERL for the black one and 995006ERL for the blue one. They are called AN "O" Ring Port Adaptors, AN-6 to
Date: 04/30/2010
Views: 3089
|
|
|
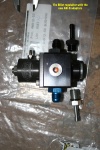
IMG_7559ann
This is the Billet regulator with the two new adaptors. When I return from India, I shall get back to work on both the brake modifications and the installation of the Billet pump and regulator.
Date: 04/30/2010
Views: 3218
|
|
|
|
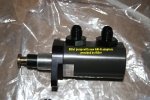
IMG_7560Ann
Dan at Billet sent a couple AN-6 adaptors to replace the hose barbs.
Date: 04/30/2010
Views: 2890
|
|
|
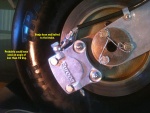
IMG_1167ann
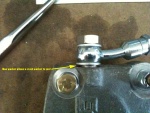
Went to the hanger after work and put the brake back together. Seems to work fine. I have not safety wired it yet as I want to add fluid, bleed and give it a good test beforehand. When all tests wel,l with no leaks, I'll wire it up. Could have used a
Date: 04/19/2010
Views: 2654
|
|
|
|
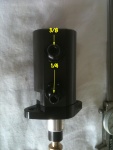
IMG_1093ann
Finally, problem #3 - 3/8" hose barb input and 1/4" hose barb output. There is an issue locating a 1/4" hose barb banjo to attach to the Rotax fuel pressure regulator.
Date: 04/03/2010
Views: 3253
|
|
|
IMG_1087ann
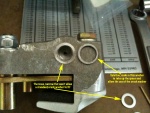
Then problem #2 - bolts that held the cover plate in place wouldn't fit into the space provided on the pump.
Date: 04/03/2010
Views: 3112
|
|
|
|
IMG_7532ann
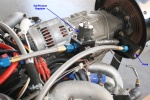
A phone call to Dan at CorbiAir resolved the first two problems. The pump is designed to REPLACE an existing pump which would have a 950 226 or 950 227 spacer/gasket in place. This would hold the pump off that edge. And if there were a pump in place, t
Date: 04/18/2010
Views: 3465
|
|
|
IMG_1086ann
Back in early April I attempted to bolt the new Billet Pump onto the gearbox. Problem #1 - It didn't fit the boss on the gearbox. It hit a raised area at the edge of the boss.
Date: 04/03/2010
Views: 2961
|
|