|
|
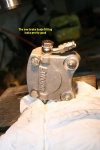
IMG_7530ann
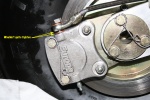
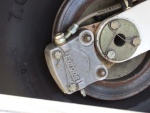
First try was just to bolt the BSPP banjo onto the brake. Needless to say, that was just too simple to work. It wouldn't seat properly in the BSPT brake.
Date: 04/18/2010
Views: 2691
|
|
|
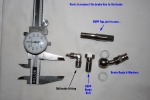
IMG_7539ann
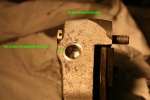
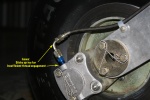
Realizing that I'd need to do any remaining work at home, I removed the disk brake, gathered up the bits and headed for the shop. This is just a pic of the BSPT threaded hole in the disk brake. Had to clean it out as it was full of crap. Testing showed
Date: 04/18/2010
Views: 2632
|
|
|
|
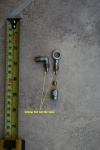
IMG_7540ann
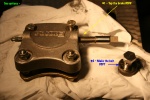
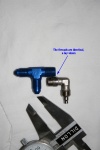
That leaves two choices: #1 - tap the brake in BSPP threads or #2 - run the BSPT die over the bolt to thread in BSPT. The brake being aluminum and the bolt being stainless steel, I decided to go with #1 as it seemed easier.
Date: 04/18/2010
Views: 2623
|
|
|
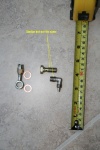
IMG_7541ann
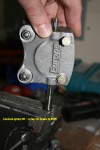
It took almost an hour to carefully and safely get the tap started in the aluminum brake. I sure didn't want to screw that up. Once I had a good start and the tap began to cut, I clamped the tap in the vice with the brake held high so chips fall out and
Date: 04/18/2010
Views: 2524
|
|
|
|
IMG_7543ann
The final result. The banjo hose end bolts nicely to the brake. With any luck, I'll take the brake back to the airport after work tomorrow and reinstall it all and see if I can bleed the brakes.
Date: 04/18/2010
Views: 2859
|
|
|
IMG_7529ann
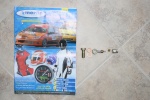
The new BSPP (British Standard Pipe Parallel) banjo bolts finally arrived from Speed Flow of Australia last week. Due to a death in the family and illnesses, I haven't gotten back to working on the Europa for several weeks. But I did today. I had also
Date: 04/18/2010
Views: 2591
|
|
|
|
IMG_7441post
Here's a look at the tubing end of the two fittings. Again, similar, but not the same. Can't use the original fitting with the new tubing.
Date: 03/19/2010
Views: 2466
|
|
|
IMG_7440post
2010 03 19 - Checked to see if the new brake banjo hardware would work while completing the Annual Condition Inspection on the Europa. This is a comparison of the original fitting from the brake with the new banjo bolt that's supposed to work. Close, bu
Date: 03/19/2010
Views: 2802
|
|
|
|
IMG_7430post
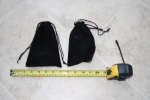
This is the way the new fuel pump and fuel pressure regulator arrived.
Date: 03/15/2010
Views: 3817
|
|
|
IMG_7431post
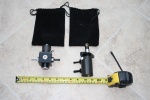
The new fuel pump on the right and fuel pressure regulator on the left.
Date: 03/15/2010
Views: 2876
|
|
|
|
IMG_7432post
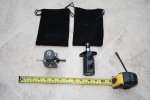
The fuel pump is supposed to be capable of 100 GPH @ 50 PSI. The fuel pressure regulator will drop that to 10 PSI for the existing Rotax fuel pressure regulator.
Date: 03/15/2010
Views: 3082
|
|
|
IMG_7429post
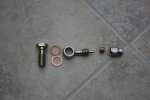
Here's a closeup of the hose end, bolt and washers. The hose end connector is identical to that which was on the master cylinder end so this should easily replace the 90 degree AN hose end provided. We'll know better later this week when I can get to th
Date: 03/15/2010
Views: 2484
|
|
|
|
IMG_7428post
My new banjo hose end for the brake arrived today. Good work Merlin Motor Sports.
Date: 03/15/2010
Views: 2563
|
|
|
IMG_7383ann
The Issue, Continued... The blue Tee connector shown has a 3/8 NPT thread on the upper leg. it is a 3/8 x 24 National Pipe Thread. That is, it has a tapered thread. The thread measures 0.373 in on the narrow end and 0.408 in on the wide end. The othe
Date: 03/07/2010
Views: 2552
|
|
|
|
Calliper 2
The best solution is shown in this pic from Mike Parkin. A Banjo fitting. The Banjo bolt is straight threads, it lies low, out of the way of grabby things and is stoutly attached. So, I have a number of bits on order from various suppliers in an attem
Date: 06/23/2009
Views: 2871
|
|
|
IMG_7382ann
The problem... The AN816 provided with the brake does not properly fit the threaded hole in the brake slave cylinder. It will screw in about two threads and that's all. You can see that the 90 degree hose end also sticks up in a big loop just waiting f
Date: 03/07/2010
Views: 3462
|
|
|
|
IMG_7384ann
The threads on both fittings are 24/in. So that's a match. The issue is one is straight and the other pipe thread.
Date: 03/07/2010
Views: 2714
|
|
|
IMG_7380ann
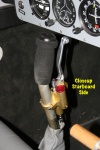
This pic is a closeup of the starboard side of the master cylinder. The red thing is the screw cap covering the brake fluid reservoir.
Date: 03/07/2010
Views: 3054
|
|
|
|
IMG_7387ann
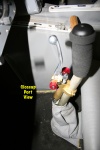
This pic shows the port side of the master cylinder. The red knob is the parking brake. You squeeze the brake lever and turn the knob (top back toward you) and release the lever. This holds the brake on. To release the brake you simply squeeze the bra
Date: 03/07/2010
Views: 3026
|
|
|
IMG_7378ann
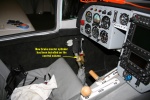
2010 03 07 - Spent Saturday working on the new brake master cylinder from MDO in France. I have it about 75% installed. Ran into some hardware issues which are shown in later pics. This pic is an overview of the new master cylinder installed on the con
Date: 03/07/2010
Views: 2770
|
|