|
|
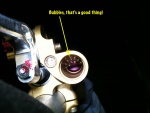
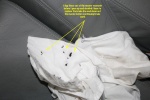
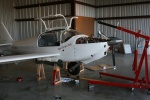
IMG_1215ann
Date: 06/13/2010
Views: 3261
|
|
|
IMG_7540ann
That leaves two choices: #1 - tap the brake in BSPP threads or #2 - run the BSPT die over the bolt to thread in BSPT. The brake being aluminum and the bolt being stainless steel, I decided to go with #1 as it seemed easier.
Date: 04/18/2010
Views: 3009
|
|
|
|
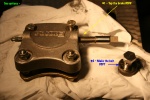
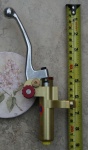
IMG_7378ann
2010 03 07 - Spent Saturday working on the new brake master cylinder from MDO in France. I have it about 75% installed. Ran into some hardware issues which are shown in later pics. This pic is an overview of the new master cylinder installed on the con
Date: 03/07/2010
Views: 3238
|
|
|
MDO_Aircraft_P1
Date: 10/18/2009
Views: 6502
|
|
|
|
IMG_7441post
Here's a look at the tubing end of the two fittings. Again, similar, but not the same. Can't use the original fitting with the new tubing.
Date: 03/19/2010
Views: 2941
|
|
|
IMG_7268post
Date: 02/21/2010
Views: 3918
|
|
|
|
IMG_7270post
Date: 02/21/2010
Views: 3775
|
|
|
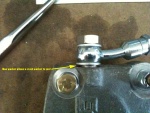
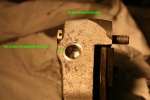
IMG_7541ann
It took almost an hour to carefully and safely get the tap started in the aluminum brake. I sure didn't want to screw that up. Once I had a good start and the tap began to cut, I clamped the tap in the vice with the brake held high so chips fall out and
Date: 04/18/2010
Views: 3008
|
|
|
|
IMG_9557ann
I dug out a bunch, and came to the conclusion that I'm going to have to order a new brake line and clean out the master cylinder before I can continue here. So I went on to the new mechanical fuel pump installation...
Date: 06/06/2010
Views: 3072
|
|
|
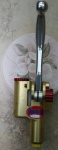
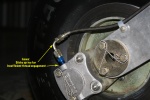
IMG_7382ann
The problem... The AN816 provided with the brake does not properly fit the threaded hole in the brake slave cylinder. It will screw in about two threads and that's all. You can see that the 90 degree hose end also sticks up in a big loop just waiting f
Date: 03/07/2010
Views: 3997
|
|
|
|
IMG_9534ann
Date: 06/03/2010
Views: 3123
|
|
|
MDO_Aircraft_P2
Date: 10/18/2009
Views: 3939
|
|
|
|
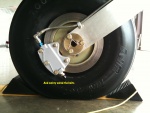
IMG_0042post
2010 07 08 - Back to the airport and back under the aircraft. With more aggressive abrasives, I was able to relieve the rub just a bit more. Not much at all, as you can see from the picture.
Date: 07/08/2010
Views: 4147
|
|
|
IMG_0037
More retraction tests. Closer, but still won't quite go into up lock. Maybe 1/4" (0.635 cm) from engaging. Back under for a couple more hours before I finally see where the blue from the fitting is rubbing on the side of the tunnel where the seat
Date: 07/07/2010
Views: 3330
|
|
|
|
IMG_1195ann
Date: 05/31/2010
Views: 3439
|
|
|
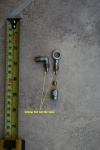
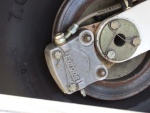
Calliper 2
The best solution is shown in this pic from Mike Parkin. A Banjo fitting. The Banjo bolt is straight threads, it lies low, out of the way of grabby things and is stoutly attached. So, I have a number of bits on order from various suppliers in an attem
Date: 06/23/2009
Views: 3272
|
|
|
|
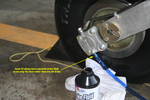
IMG_0916post
Safety wired the bolts and check the installation. Pushed the aircraft and the brake stopped it. Held the brake and tried to push it aircraft. It wouldn't budge. Very good. Pulled it out of the hanger, started it up, let it warm properly and taxi tes
Date: 07/01/2010
Views: 5228
|
|
|
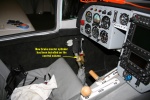
IMG_0921post
After I put the aircraft back into the hanger, I loosened the master cylinder and rotated it about 30 degrees to the starboard. I'll see how that works tomorrow.
Date: 07/01/2010
Views: 3141
|
|
|
|
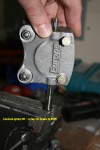
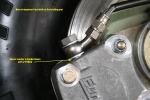
IMG_7539ann
Realizing that I'd need to do any remaining work at home, I removed the disk brake, gathered up the bits and headed for the shop. This is just a pic of the BSPT threaded hole in the disk brake. Had to clean it out as it was full of crap. Testing showed
Date: 04/18/2010
Views: 3066
|
|
|
IMG_9536ann
Date: 06/03/2010
Views: 3200
|
|