|
|
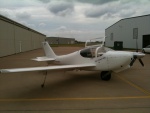
IMG_0918post
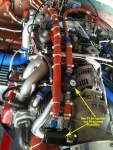
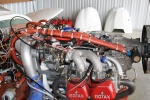
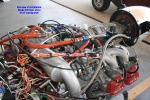
Some pics after the engine run-up and taxi tests today.
Date: 07/01/2010
Views: 3945
|
|
|
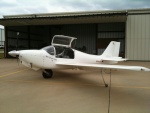
IMG_0919post
Some pics after the engine run-up and taxi tests today.
Date: 07/01/2010
Views: 3043
|
|
|
|
IMG_0920post
Some pics after the engine run-up and taxi tests today.
Date: 07/01/2010
Views: 5112
|
|
|
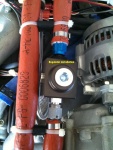
IMG_1237ann
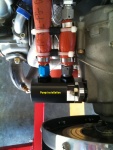
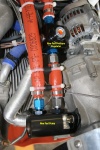
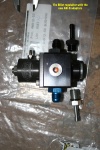
The new regulator is 25 psi. Should be plenty of pressure available to feed the 914.
Date: 06/21/2010
Views: 3631
|
|
|
|
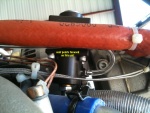
IMG_1238ann
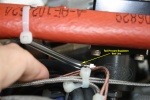
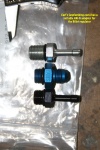
The vent port was reversed from the original regulator. This one points forward. Had to do some tugging on tubing to get it all arranged. As soon as I have my new brake caliper installed and tested, I'll be ready to start testing the engine.
Date: 06/21/2010
Views: 3570
|
|
|
IMG_1235ann
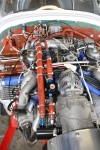
2010 06 21 - The new Billet pump and regulator arrived so I went out to the hanger and installed it. The new pump and regulator were supplied with AN6 Flared Tube fittings this time so the exchange was trivial. Must have taken all of 5 minutes.
Date: 06/21/2010
Views: 4097
|
|
|
|
IMG_1236ann
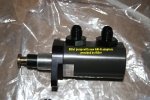
The new pump is rated at 50 psi output.
Date: 06/21/2010
Views: 3814
|
|
|
Short Billet Fuel Pump Test #1
2010 06 17 - I ran my Rotax 914 today for the first time without using the electric fuel pumps. It ran solely one the Billet mechanical pump. Just a test run, at idle, allowed to warm up to operating temps and did a short (2 meter) taxi to test the new
Date: 06/18/2010
Views: 3007
|
|
|
|
IMG_9572post
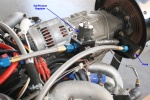
Made sure that the vent line was attached and run to the back and down into the area below the engine, but not into the air stream.
Date: 06/12/2010
Views: 3843
|
|
|
IMG_9571post
The fuel lines were tied with tie-wraps and 1/2" (12.7 mm) rubber fuel hose lengths. The vent hose was tied in as well by running it through short lengths of fuel hose and using tie-wraps to hold the rubber hose and protect the vent line from chafin
Date: 06/12/2010
Views: 4404
|
|
|
|
IMG_9569post
A side view of the installation. Tomorrow I'll be trying to complete the installation of the new control column mounted brake master cylinder. If that is done and I have working brakes, we may try an engine run.
Date: 06/12/2010
Views: 4264
|
|
|
IMG_9570ann
2010 06 12 - Completed the plumbing for the new mechanical fuel pump this morning. Fire shield on all fuel lines. Everything connected in the proper sequence.
Date: 06/12/2010
Views: 3657
|
|
|
|
IMG_9558ann
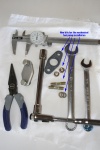
Gathered up the bits needed to install the new pump: spacer/gasket, studs, lock washers & nuts.
Date: 06/06/2010
Views: 4112
|
|
|
IMG_9560ann
The pump bolted in like it was made for the Rotax. Added hose and fuel pressure regulator. Oops, the regulator will have to be turned so the big grey thing is down, not up. Oh well, just a test fit for now.
Date: 06/06/2010
Views: 3388
|
|
|
|
IMG_9561ann
Overview. Flip the fuel pressure regulator, add firesleeve and put in the AN6-6 nipple to connect the input hose to the input fuel flow meter and the installation will be complete. Maybe later this week when all the bits for the brake and fuel line come
Date: 06/06/2010
Views: 3685
|
|
|
IMG_7558post
I located a couple AN-6 adaptors to replace the hose barbs on the regulator. The adaptors are from Earl's (anplumbing.com), part #AT985006ERL for the black one and 995006ERL for the blue one. They are called AN "O" Ring Port Adaptors, AN-6 to
Date: 04/30/2010
Views: 3762
|
|
|
|
IMG_7559ann
This is the Billet regulator with the two new adaptors. When I return from India, I shall get back to work on both the brake modifications and the installation of the Billet pump and regulator.
Date: 04/30/2010
Views: 3806
|
|
|
IMG_7560Ann
Dan at Billet sent a couple AN-6 adaptors to replace the hose barbs.
Date: 04/30/2010
Views: 3487
|
|
|
|
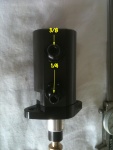
IMG_1093ann
Finally, problem #3 - 3/8" hose barb input and 1/4" hose barb output. There is an issue locating a 1/4" hose barb banjo to attach to the Rotax fuel pressure regulator.
Date: 04/03/2010
Views: 3888
|
|
|
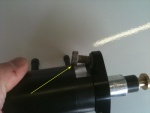
IMG_1087ann
Then problem #2 - bolts that held the cover plate in place wouldn't fit into the space provided on the pump.
Date: 04/03/2010
Views: 3789
|
|