|
|
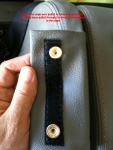
1_snaps
The snap bases for the seat back cushions were poorly installed by my interior guy. Just a skinny screw through the over-sized hole the snap base where the original rivet went.
Date: 06/23/2011
Views: 4729
|
|
|
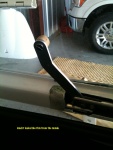
2_snaps
When the tab on the back of the pilot cushion was pulled to remove it, the snap bases pulled through the screw head and remained in the snaps. You should be able to see the snap bases in the snaps in this picture.
Date: 06/23/2011
Views: 4790
|
|
|
|
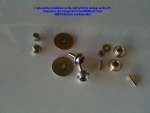
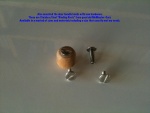
3_snaps
The original snap base hardware is on the right. The new snap bases and mounting hardware are on the left. These 6-32 screw mount snap bases are from McMaster-Carr. I used big ol' AN970 washers for more support underneath and nyloc nuts so they don't c
Date: 06/23/2011
Views: 4292
|
|
|
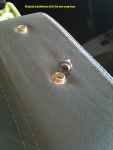
4_snaps
Here is a picture of the original snap bases still on the passenger head rest along with one of the new screw snap bases.
Date: 06/23/2011
Views: 4517
|
|
|
|
5_snaps
The new snap bases installed in the head rest.
Date: 06/23/2011
Views: 4571
|
|
|
6_snaps
Seat cushions installed and snapped into place.
Date: 06/23/2011
Views: 4553
|
|
|
|
2_Door_Knobs
They work well without any protruding or scratch making lumps or bumps.
Date: 06/23/2011
Views: 3922
|
|
|
3_Door_Knobs
Similarly, the screw portion is nice and flat so it won't hang up on the aluminum guard plate when pressed closed.
Date: 06/23/2011
Views: 5092
|
|
|
|
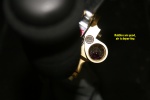
1_Door_Knobs
The new door knob mounting hardware is a stainless steel "binding post" acquired from McMaster-Carr. These things are available in myriad materials and sizes. There just happened to be a perfect size in the stainless steel variety which I pref
Date: 06/23/2011
Views: 4599
|
|
|
IMG_0041post
But it was enough to allow the LG to retract fully. Ran the gear up and down about a dozen times. Works great.
Date: 07/08/2010
Views: 4419
|
|
|
|
IMG_0044post
So it's back to bleeding the brakes again. Pull the lines out so there's no high spots and there's an "all up" run to the master cylinder. Connect the bleed contraption and wait.
Date: 07/08/2010
Views: 3723
|
|
|
IMG_0045post
Put a bit of fluid in the reservoir and observe bubbles. Air is being pushed out and replaced by fluid. That's good. Watched this for almost an hour till the bubbles stopped and the reservoir began to fill. Shut the bleed contraption, stuff the line b
Date: 07/08/2010
Views: 4189
|
|
|
|
IMG_0046post
Button the cowl and tidy things up. Looked out the door (West) and the weather was calm, not many 150's in the pattern. Looks like a great time to go and try it out. Filthy from the elbows to the finger tips so I have to hit the WC and clean myself bef
Date: 07/08/2010
Views: 3603
|
|
|
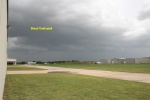
IMG_0047post
Walked down to the corner of the hanger to the next line of hangers where there is a WC. This is what I saw to the Southeast. Not looking good. Went to the WC and cleaned up. Looked even more threatening after the wash. Decided to close up and go hom
Date: 07/08/2010
Views: 3366
|
|
|
|
IMG_0048post
And none too soon! This is what I hit departing the airport. We'll see what the weather is like tomorrow morning. Maybe try to fly then.
Date: 07/08/2010
Views: 6225
|
|
|
IMG_0042post
2010 07 08 - Back to the airport and back under the aircraft. With more aggressive abrasives, I was able to relieve the rub just a bit more. Not much at all, as you can see from the picture.
Date: 07/08/2010
Views: 4243
|
|
|
|
IMG_0036
2010 07 07 - Back to retraction tests. Thought that the fixtures sticking up off the caliper might be a problem. Replaced them with the 90 degree fitting and a straight hose end. Much neater and more compact, but I'll have to bleed the brakes again whe
Date: 07/07/2010
Views: 3937
|
|
|
IMG_0037
More retraction tests. Closer, but still won't quite go into up lock. Maybe 1/4" (0.635 cm) from engaging. Back under for a couple more hours before I finally see where the blue from the fitting is rubbing on the side of the tunnel where the seat
Date: 07/07/2010
Views: 3440
|
|
|
|
IMG_0035
2010 07 06 - Wondered how the new brake would work on retraction. Set up for retraction testing. LG lever went to about 1/2" (1.275 cm) from the up lock and wouldn't go any further. Hitting something. Spent several hours trying to see what what
Date: 07/06/2010
Views: 3540
|
|
|
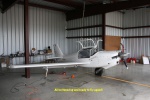
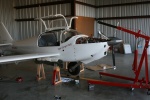
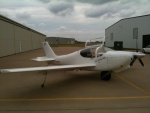
IMG_0918post
Some pics after the engine run-up and taxi tests today.
Date: 07/01/2010
Views: 3936
|
|