|
|
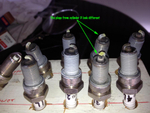
IMG_3327em
Next request was for a compression check. 80/80, 80/80, 80/80, 79/80. No problem there. But while doing this I decided to check the plugs. Cylinder #3 plugs looked different. WHY?
Date: 06/12/2012
Views: 7218
|
|
|
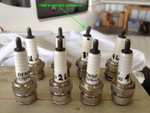
IMG_3331em
Turn the plugs over and one plug on #3 looks funny. Calls for a closer look...
Date: 06/12/2012
Views: 6200
|
|
|
|
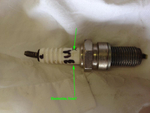
IMG_3332em
Looks like that plug had been bumped some time during transport. Porcelain shows a crack. OK, replaced ALL the plugs. Engine still didn't run right.
Date: 06/12/2012
Views: 8005
|
|
|
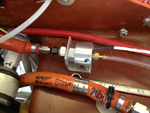
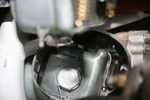
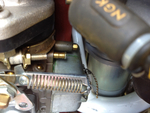
IMG_3277post
After the engine run still surged, I investigated the seating of the float bowls & gaskets. This one shows how the new gasket wasn't properly located, see arrow.
Date: 05/30/2012
Views: 6469
|
|
|
|
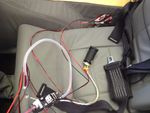
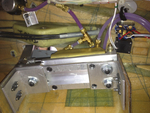
IMG_3214
Then I removed all the cheep crap connectors (with folded sheet metal pins) provided with the gage package, re-ran all the wiring and replaced the cheep connectors with good, 9-pin, sub-D connectors.
Date: 05/17/2012
Views: 6560
|
|
|
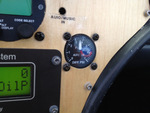
IMG_3217
Mounted the gage and turned on the electric fuel pump. Bingo! A pressure reading. It works now. So now I have a good operating differential pressure gage.
Date: 05/18/2012
Views: 6712
|
|
|
|
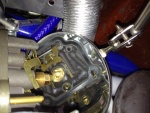
IMG_3213
As an aside, while trouble shooting this problem, I decided to try and get the differential pressure gage working. Spent quite a bit of time on this over a year ago but could never get it to work. Anyway, I reinstalled the differential sensor unit and p
Date: 05/17/2012
Views: 6519
|
|
|
IMG_3238
Moved over to the port side and did the same with this carb.
Date: 05/21/2012
Views: 6916
|
|
|
|
IMG_2604
Got out the inspection mirror and made sure the gasket was in place all the way round the bowl. It was.
Date: 05/30/2012
Views: 7999
|
|
|
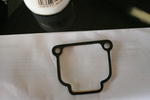
IMG_3277
Here's a better picture of the nitrile gasket in place on the port carb gasket groove.
Date: 05/30/2012
Views: 6105
|
|
|
|
IMG_3278
And the float bowl back in place, with no gasket sticking out anywhere. Then it was torqued down and safety wired. Both drip trays were then re-installed. Lastly, I ran the electric fuel pump for several minutes (at 6 PSI according to the gage) and che
Date: 05/30/2012
Views: 6887
|
|
|
IMG_3220
Similar staining and residual fuel on the port side as well.
Date: 05/18/2012
Views: 6370
|
|
|
|
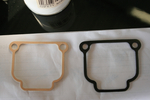
IMG_2598
The culprit seems to be the compressed paper gasket material which dries out if it sits for a while and then leaks. Cork gaskets were recommended as a replacement. Unfortunately, cork gaskets were not available. So I did a Google search and came up wi
Date: 05/30/2012
Views: 6030
|
|
|
IMG_2599
Here the nitrile gasket is lying on top of the paper gasket, They are dimensionally identical. The nitrile gasket is quite soft and flexible. The paper gasket is stiff and hard.
Date: 05/30/2012
Views: 6208
|
|
|
|
IMG_2601
I took the float bowl off the starboard carb and removed the old gasket. The instructions with the new nitrile gasket said to apply some grease to hold the gasket in place while the bowl was replaced. I didn't have any grease but I had some light oil wh
Date: 05/30/2012
Views: 4993
|
|
|
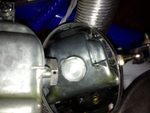
IMG_2603
I replaced the float bowl, torqued the "nut" to 48.7 ft-lbs and safety wired it as per Rotax specs.
Date: 05/30/2012
Views: 5811
|
|
|
|
IMG_3218
Once the brakes seemed to be OK it was time to run the engine and check it out. That didn't go well. Started well, warmed up with a bit of choke at the beginning. Smoothed out nicely and idled properly after it was all warmed up. Then I added throttle
Date: 05/18/2012
Views: 7196
|
|
|
IMG_2755
New brake master cylinder set, installed and viewed from the tunnel. Brakes have been bled and seem to work well. Taxi testing will tell just how well they work.
Date: 04/24/2012
Views: 6439
|
|
|
|
IMG_2744
New brake master cylinders installed. No handles on the levers yet. Some measurement to do first.
Date: 04/19/2012
Views: 5993
|
|
|
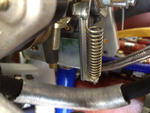
New MC-4A 10
The aft holes have been drilled and the MC-4A's are bolted in place to check the fit.
Date: 04/15/2012
Views: 4490
|
|