|
|
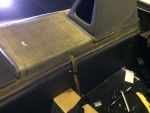
IMG_7738
Everything pretty much back together. Eight months work at this point.
Date: 05/10/2014
Views: 20368
|
|
|
IMG_7736
Reinstalled the shoulder harnesses and seats
Date: 05/10/2014
Views: 15349
|
|
|
|
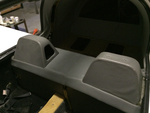
IMG_7730
Returned the upholstery on to the back.
Date: 05/09/2014
Views: 16590
|
|
|
IMG_7735
Not as nice as it was but still not looking too shabby.
Date: 05/10/2014
Views: 14061
|
|
|
|
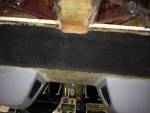
IMG_7438
The back is well bonded across the width of the wall, as are the two sides.
Date: 03/11/2014
Views: 13791
|
|
|
IMG_7535
Then we had a bit of drama as the sink developed a leak in the feed line.
Date: 03/20/2014
Views: 12471
|
|
|
|
IMG_7536
It was a pretty good flow of water for a while. Flooding the back of the hanger. No real damage as, from previous experience, I try to keep things off the hanger floor in any case.
Date: 03/20/2014
Views: 14180
|
|
|
IMG_7567
Time to start putting upholstery back in place.
Date: 03/29/2014
Views: 11713
|
|
|
|
IMG_7568
And reconnecting the aileron tie rods.
Date: 03/29/2014
Views: 13030
|
|
|
IMG_7704
And fixing the passenger side door sill.
Date: 05/02/2014
Views: 15688
|
|
|
|
IMG_7712
Door sill repaired.
Date: 05/04/2014
Views: 12994
|
|
|
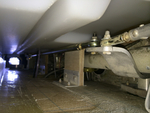
IMG_7321
Checking the back.
Date: 02/17/2014
Views: 13424
|
|
|
|
IMG_7322
Checking the back.
Date: 02/17/2014
Views: 12989
|
|
|
IMG_7324
Checking the back. Looks like a good fit overall.
Date: 02/17/2014
Views: 13156
|
|
|
|
IMG_7365
Getting the sight gage plumbing in place.
Date: 02/22/2014
Views: 12675
|
|
|
IMG_7366
Applying the fiberglass/epoxy strips to the port side. Plastic wrap to prevent the epoxy from bonding to the tools used to hold the strip in place.
Date: 02/22/2014
Views: 12809
|
|
|
|
IMG_7367
Applying the fiberglass/epoxy strips to the starboard side.
Date: 02/22/2014
Views: 11277
|
|
|
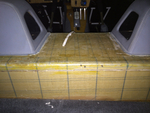
IMG_7393
Shot bags (25 lbs each) to hold the top in place for the final bonding. 2 plies of fiberglass over a micro filler in the cut.
Date: 03/01/2014
Views: 11023
|
|
|
|
IMG_7430
The front has bonded nicely around the sight gage entry.
Date: 03/11/2014
Views: 10294
|
|
|
IMG_7235
A strip being bonded to the front wall.
Date: 01/31/2014
Views: 10410
|
|