|
|
IMG_0915post
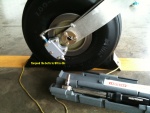
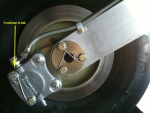
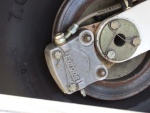
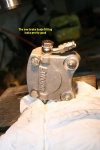
I stuffed the brake line back into the aircraft, tied it all down and screwed it to the swing arm. Bolted the new caliper to the brake disk and torqued it to 90 in-lbs.
Date: 07/01/2010
Views: 4500
|
|
|
IMG_1193ann
Date: 05/31/2010
Views: 4996
|
|
|
|
DSC04015_Large_post
Date: 10/19/2009
Views: 5541
|
|
|
IMG_0048post
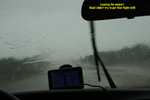
And none too soon! This is what I hit departing the airport. We'll see what the weather is like tomorrow morning. Maybe try to fly then.
Date: 07/08/2010
Views: 8492
|
|
|
|
IMG_7269post
Date: 02/21/2010
Views: 5032
|
|
|
DSC04016_Large_post
Date: 10/19/2009
Views: 6608
|
|
|
|
IMG_7382ann
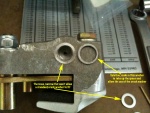
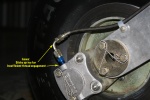
The problem... The AN816 provided with the brake does not properly fit the threaded hole in the brake slave cylinder. It will screw in about two threads and that's all. You can see that the 90 degree hose end also sticks up in a big loop just waiting f
Date: 03/07/2010
Views: 6023
|
|
|
IMG_7441post
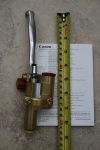
Here's a look at the tubing end of the two fittings. Again, similar, but not the same. Can't use the original fitting with the new tubing.
Date: 03/19/2010
Views: 4507
|
|
|
|
IMG_1223ann
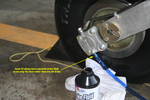
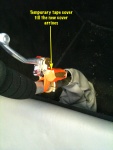
2010 06 21 - What's this, the 4th or 5th try at getting a seal on the banjo to the brake caliper? Still leaks.
Date: 06/21/2010
Views: 5164
|
|
|
IMG_1167ann
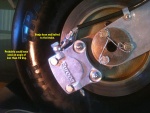
Went to the hanger after work and put the brake back together. Seems to work fine. I have not safety wired it yet as I want to add fluid, bleed and give it a good test beforehand. When all tests wel,l with no leaks, I'll wire it up. Could have used a
Date: 04/19/2010
Views: 4775
|
|
|
|
IMG_0888post
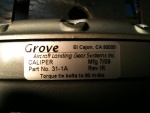
This is the Grove brake caliper I am using. It may not be the perfect replacement for the Europa brake but it sure works. I've e-mailed Robby at Grove and asked if he'd like me to send the old Europa brake caliper to see if they have a better replacemen
Date: 06/29/2010
Views: 4657
|
|
|
IMG_7380ann
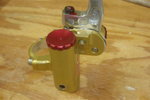
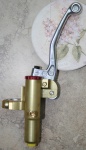
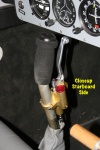
This pic is a closeup of the starboard side of the master cylinder. The red thing is the screw cap covering the brake fluid reservoir.
Date: 03/07/2010
Views: 4950
|
|
|
|
Calliper 2
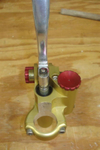
The best solution is shown in this pic from Mike Parkin. A Banjo fitting. The Banjo bolt is straight threads, it lies low, out of the way of grabby things and is stoutly attached. So, I have a number of bits on order from various suppliers in an attem
Date: 06/23/2009
Views: 4713
|
|
|
IMG_0912post
After much flailing about which shall not be documented here, I went back to the double puck brake and spent a couple days trying to bleed the new system. Without much luck. I called Robby at Grove Aircraft and he pointed out that if there were any high
Date: 07/01/2010
Views: 5363
|
|
|
|
IMG_9536ann
Date: 06/03/2010
Views: 4889
|
|
|
IMG_7529ann
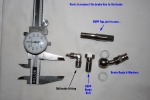
The new BSPP (British Standard Pipe Parallel) banjo bolts finally arrived from Speed Flow of Australia last week. Due to a death in the family and illnesses, I haven't gotten back to working on the Europa for several weeks. But I did today. I had also
Date: 04/18/2010
Views: 4790
|
|
|
|
IMG_7543ann
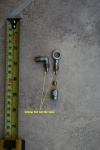
The final result. The banjo hose end bolts nicely to the brake. With any luck, I'll take the brake back to the airport after work tomorrow and reinstall it all and see if I can bleed the brakes.
Date: 04/18/2010
Views: 5443
|
|
|
IMG_7267post
Date: 02/21/2010
Views: 4754
|
|
|
|
IMG_7266Crop
Date: 02/21/2010
Views: 6063
|
|
|
IMG_1218ann
Date: 06/13/2010
Views: 5746
|
|