|
|
MDO_Aircraft_P1
Date: 10/18/2009
Views: 10068
|
|
|
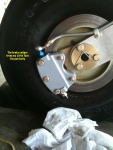
Calliper 2
The best solution is shown in this pic from Mike Parkin. A Banjo fitting. The Banjo bolt is straight threads, it lies low, out of the way of grabby things and is stoutly attached. So, I have a number of bits on order from various suppliers in an attem
Date: 06/23/2009
Views: 4712
|
|
|
|
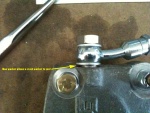
IMG_7384ann
The threads on both fittings are 24/in. So that's a match. The issue is one is straight and the other pipe thread.
Date: 03/07/2010
Views: 4587
|
|
|
IMG_7267post
Date: 02/21/2010
Views: 4753
|
|
|
|
IMG_1216ann
Date: 06/13/2010
Views: 5165
|
|
|
IMG_1167ann
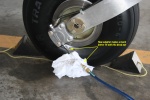
Went to the hanger after work and put the brake back together. Seems to work fine. I have not safety wired it yet as I want to add fluid, bleed and give it a good test beforehand. When all tests wel,l with no leaks, I'll wire it up. Could have used a
Date: 04/19/2010
Views: 4774
|
|
|
|
IMG_0046post
Button the cowl and tidy things up. Looked out the door (West) and the weather was calm, not many 150's in the pattern. Looks like a great time to go and try it out. Filthy from the elbows to the finger tips so I have to hit the WC and clean myself bef
Date: 07/08/2010
Views: 5198
|
|
|
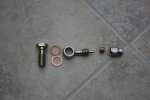
IMG_7429post
Here's a closeup of the hose end, bolt and washers. The hose end connector is identical to that which was on the master cylinder end so this should easily replace the 90 degree AN hose end provided. We'll know better later this week when I can get to th
Date: 03/15/2010
Views: 4723
|
|
|
|
IMG_0921post
After I put the aircraft back into the hanger, I loosened the master cylinder and rotated it about 30 degrees to the starboard. I'll see how that works tomorrow.
Date: 07/01/2010
Views: 4744
|
|
|
IMG_1233ann
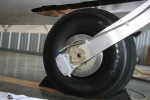
Went home and pulled a brake caliper off my Little Toot project. Brought it out to the hanger and the darn thing fits. So I have ordered a single puck version of the same brake caliper. When it arrives, it will go on and I'll replace the banjo hose end
Date: 06/21/2010
Views: 4945
|
|
|
|
IMG_1195ann
Date: 05/31/2010
Views: 5197
|
|
|
IMG_0042post
2010 07 08 - Back to the airport and back under the aircraft. With more aggressive abrasives, I was able to relieve the rub just a bit more. Not much at all, as you can see from the picture.
Date: 07/08/2010
Views: 5999
|
|
|
|
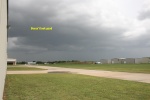
IMG_0047post
Walked down to the corner of the hanger to the next line of hangers where there is a WC. This is what I saw to the Southeast. Not looking good. Went to the WC and cleaned up. Looked even more threatening after the wash. Decided to close up and go hom
Date: 07/08/2010
Views: 4807
|
|
|
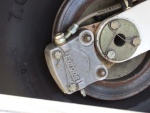
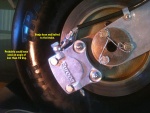
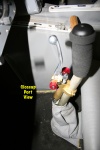
IMG_7387ann
This pic shows the port side of the master cylinder. The red knob is the parking brake. You squeeze the brake lever and turn the knob (top back toward you) and release the lever. This holds the brake on. To release the brake you simply squeeze the bra
Date: 03/07/2010
Views: 5144
|
|
|
|
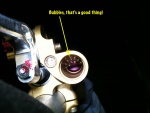
IMG_9562ann
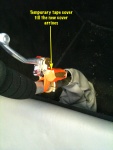
2010 06 06 - Made up an adaptor that fits the bleed and doesn't leak. Began to run fluid into the system. Went up to the master cylinder/reservoir to check on progress. Was I getting bubbles through the bit of fluid it put in back on the 3rd?
Date: 06/06/2010
Views: 4658
|
|
|
IMG_0036
2010 07 07 - Back to retraction tests. Thought that the fixtures sticking up off the caliper might be a problem. Replaced them with the 90 degree fitting and a straight hose end. Much neater and more compact, but I'll have to bleed the brakes again whe
Date: 07/07/2010
Views: 6360
|
|
|
|
IMG_1218ann
Date: 06/13/2010
Views: 5743
|
|
|
MDO_Aircraft_P2
Date: 10/18/2009
Views: 6278
|
|
|
|
DSC04014_Large_post
Date: 10/19/2009
Views: 5599
|
|
|
IMG_1215ann
Date: 06/13/2010
Views: 5349
|
|