|
|
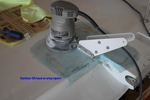
IMG_1669
Evaluating how the reservoir will be mounted/attached.
Date: 04/13/2011
Views: 4835
|
|
|
IMG_0118post
Date: 09/03/2010
Views: 4214
|
|
|
|
IMG_0105post
Date: 09/03/2010
Views: 5007
|
|
|
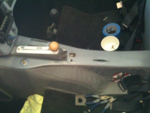
IMG_1578ann
2011 03 11 Installation of the parking brake valve completed and the brake lines attached. Hard to believe that took all day...
Date: 03/11/2011
Views: 4025
|
|
|
|
IMG_0183post
Date: 09/07/2010
Views: 4076
|
|
|
New MC-4A 04
The MC-4A's must fit within this length and that 3/4" should allow the fit.
Date: 04/15/2012
Views: 5153
|
|
|
|
IMG_1402
Received the replacement X for the Reg. No. Unfortunately, they made up the wrong X. Note the drop shadow. Order another one...
Date: 05/27/2011
Views: 4987
|
|
|
IMG_0082post
Date: 09/02/2010
Views: 4642
|
|
|
|
IMG_0927ann
And fill/sand continues on the wing repair areas.
Date: 03/02/2011
Views: 4424
|
|
|
IMG_1675
End of April. Still fitting wheel pants and gear leg fairings. Here a picture of work on the console cover.
Date: 04/29/2011
Views: 6147
|
|
|
|
6_snaps
Seats reinstalled in the cockpit. Snap tabs to the headrests work great now. A bit more detail is available in the Modifications album
Date: 06/23/2011
Views: 4448
|
|
|
IMG_1287ann
The console cover cut out. Now I have to figure out how to make the cuts for the slots for the brake levers and parking brake. Later there will be cutouts for the flap and trim switches as well as the brake reservoir.
Date: 03/30/2011
Views: 5513
|
|
|
|
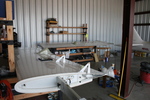
Wings ready to go
Fully assembled wings ready to go back on the aircraft.
Date: 06/29/2011
Views: 4606
|
|
|
IMG_1334ann
2010 10 18 No pics of unloading the Europa at home hanger. But a few days later I had the making for two new work benches to be constructed for the hanger. This is one of the work benches.
Date: 10/08/2010
Views: 4383
|
|
|
|
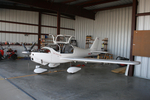
Wings on 1
Tommy and Russ stopped by to help me put the wings back on.
Date: 07/01/2011
Views: 5310
|
|
|
IMG_2703
2012 04 11 - Bits arrived today. Relocated (lower) the holes for the bolt which will hold the aft ends of the master cylinders. Also removed more metal from the brackets.
Date: 04/11/2012
Views: 6183
|
|
|
|
IMG_1236ann
Cut along the tape strip.
Date: 03/23/2011
Views: 4998
|
|
|
IMG_0241post
Date: 09/12/2010
Views: 8933
|
|
|
|
IMG_2685
I elected to make up a support structure from some 12" 1 1/2 x 1 1/2 wide aluminum angle i had in my aluminum bin. Cut two lengths 5 1/2" long and clamped them to the base well centered and drilled out holes matching the base. Attached them t
Date: 04/09/2012
Views: 5154
|
|
|
IMG_0041post
Date: 09/01/2010
Views: 5010
|
|