|
|
p1000628
p1000628.jpg
Date: 02/14/2012
Views: 15954
|
|
|
dsc08662
The 10“ diameter from the pilot hole.
Date: 04/22/2012
Views: 26416
|
|
|
|
dsc08616
Same here, rust needs to go! Open to ideas.....
Date: 04/10/2012
Views: 22918
|
|
|
dsc09018
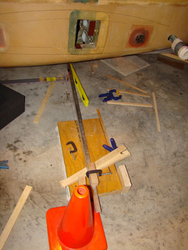
Started to make the axle jig. Used a simple setup of first taking large flat blocks of wood and caulking it to the floor somewhere over FS70. Then that allows me to fix the aluminum angle with a single screw once in its final position.
Date: 01/10/2013
Views: 22341
|
|
|
|
dsc08607
Starting to prep the bays for the tri-gear conversion.
Date: 04/10/2012
Views: 23084
|
|
|
p1000725
p1000725.jpg
Date: 03/12/2012
Views: 13503
|
|
|
|
dsc08600
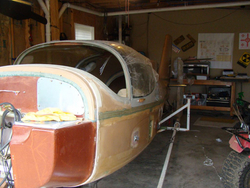
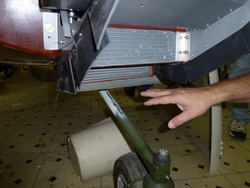
Thinking of modifying the mono wheel trailer as a jig to perform the tri-gear conversion.
Date: 04/10/2012
Views: 43719
|
|
|
dsc09035
Rib one after cure of 420 and peel ply removed. Think we used 112g of 420 here due to the odd angle.
Date: 01/23/2013
Views: 19481
|
|
|
|
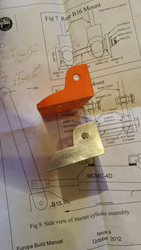
Wanted to make a copy of B16 to make the cuts on before I cut the actual B16 part.
Wanted to make a copy of B16 to make the cuts on before I cut the actual B16 part.
Date: 04/03/2016
Views: 27183
|
|
|
dsc08965
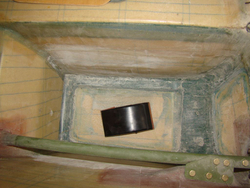
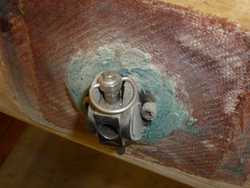
Port side after layups and peel ply removed. Notice shape of hole for the angle of the LG socket. I wrapped the LG socket with sandpaper and used it to form the hole.
Date: 10/01/2012
Views: 23387
|
|
|
|
Close up of the relief cut.
Close up of the relief cut.
Date: 04/03/2016
Views: 27077
|
|
|
dsc08636
Here is Bill placing in some 2x6's to act as a support for the rear rib. The I-beam is 3 inches wide so the 2x6 fit perfectly. I'll explain later how those come into play.
Date: 04/15/2012
Views: 20726
|
|
|
|
dsc08626
Put in a 2x4 in the main wing spar tunnel and located the pins. This was only used to aid in keeping the plane from tipping.
Date: 04/14/2012
Views: 35123
|
|
|
p1000692
p1000692.jpg
Date: 03/12/2012
Views: 11854
|
|
|
|
nex_2014_01_12_01
Bolt hole for LG port side filed to size.
Date: 01/13/2014
Views: 18218
|
|
|
p1000631
p1000631.jpg
Date: 02/14/2012
Views: 14087
|
|
|
|
p1000716
p1000716.jpg
Date: 03/12/2012
Views: 13422
|
|
|
p1000708
p1000708.jpg
Date: 03/12/2012
Views: 12453
|
|
|
|
p1000715
p1000715.jpg
Date: 03/12/2012
Views: 13908
|
|
|
p1000634
p1000634.jpg
Date: 02/14/2012
Views: 13012
|
|