|
|
dsc09022
Here you see I used bondo on the shims and screwed them down into the block. The shims made sure the guide was level. Also note the hole drilled in the Aluminum angle and the shim. This is where I fixed the guide for the curing stage to ensure nothing
Date: 01/22/2013
Views: 22689
|
|
|
dsc09023
Ensure you have a good key. I used the drill press to create the dimples. These will be filled with 420 and flox when doing the glass layups.
Date: 01/22/2013
Views: 21525
|
|
|
|
dsc09024
I was really anal about keeping the socket holes tight. This proved to be more work than it was worth and was fighting the tight fit when it came to locating the axles. Do yourself a favor and just make them a little bigger, 1/8 or so. This gap will be
Date: 01/22/2013
Views: 22356
|
|
|
dsc09027
Mixing that expensive 420.
Date: 01/22/2013
Views: 20587
|
|
|
|
dsc09028
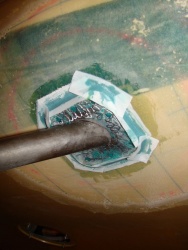
Here the axles are getting the green goop. I used car carnauba wax as a release agent. Worked well jut get it on there thick. We also wrapped the top of the sockets with glad wrap to keep contaminates off of it while we moved it around.
Date: 01/22/2013
Views: 21975
|
|
|
dsc09029
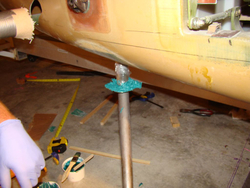
Gear legs clamped in place, no toe in/out per Bud. You cant see it in the photo but I used a green tip .30 bullet as a homemade plum bob that was attached to dead center of the aluminum angle. This helped us keep the guide over the center line. Oh make
Date: 01/22/2013
Views: 21164
|
|
|
|
dsc09030
Starboard side done.
Date: 01/22/2013
Views: 20381
|
|
|
dsc09032
Port side done.
Date: 01/22/2013
Views: 19520
|
|
|
|
dsc09033
Port side done.
Date: 01/22/2013
Views: 19355
|
|
|
dsc09034
Starboard side done. Pic taken before a little clean up.
Date: 01/22/2013
Views: 19402
|
|
|
|
dsc09035
Rib one after cure of 420 and peel ply removed. Think we used 112g of 420 here due to the odd angle.
Date: 01/23/2013
Views: 19481
|
|
|
dsc09036
Rib one port side again used around 112g of 420 cured at 78f for 12 hours.
Date: 01/23/2013
Views: 19810
|
|
|
|
dsc09037
Making a template for rib 2. Do yourself a favor and do not use the templates in the manual you will end up waisting your plywood, just make your own.
Date: 01/23/2013
Views: 21118
|
|
|
dsc09018
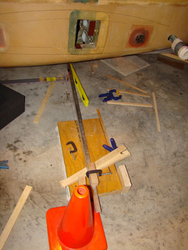
Started to make the axle jig. Used a simple setup of first taking large flat blocks of wood and caulking it to the floor somewhere over FS70. Then that allows me to fix the aluminum angle with a single screw once in its final position.
Date: 01/10/2013
Views: 22341
|
|
|
|
dsc09019
Trash can is the best way to hold the landing gear legs.
Date: 01/10/2013
Views: 22059
|
|
|
dsc09020
Bill helping by putting a good key on the sockets.
Date: 01/22/2013
Views: 21175
|
|
|
|
E2
Date: 10/05/2012
Views: 23351
|
|
|
E1
[quote="Bud Yerly"]"Make a glass cover that fits the hole out of three sheets of bid laid up on a flat surface. After cure, hold it up to the bottom of the plane and mark the contour. Cut and approximate the fit. It should be near level
Date: 10/05/2012
Views: 24136
|
|
|
|
dsc08967
Little clean up required on Port side.
Date: 10/01/2012
Views: 21478
|
|
|
dsc08965
Port side after layups and peel ply removed. Notice shape of hole for the angle of the LG socket. I wrapped the LG socket with sandpaper and used it to form the hole.
Date: 10/01/2012
Views: 23387
|
|