Kingsley 4 Undercarriage latched up viewed from below.
Date: 09/04/2005
Views: 4707
Newest Image
EAA SITE
Date: 08/23/2023
Views: 183018
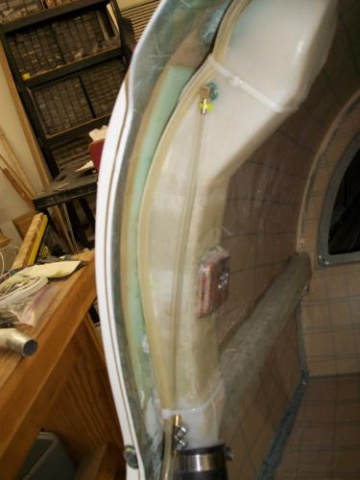
Buds Cobra strengthening.
Y10-05-13
 Photo E-mail Play
slideshow<http://photos.msn.com/Viewing/Album.aspx?PST=8nK2AN1B!1LEiKSdooxx9v4CFFiF2tnPWP2mfc7Vl*tK8zynHq0aFwS7xyuUUORT5dlN4XEFfQoS52BHh7nFQw%24%24>
| Download images
<http://photos.msn.com/viewing/Photos.aspx?pi_Type=SlideshowTask&Task=Download&stppData=&pi_ImagesOnly=1&Folder=nBuRgwTGIGjZPMtNhxCyPhYLUBR*bYP219350fKPSz8%24&User=23IQaj7Z2BRqNO1wUECSpX*P0Ju9hSGI&pi_NoLogin=1>
Bill,
I just saw your post on the list.
I am sorry, I thought this was now common knowledge, and I apologize to everyone on
the list. Sometimes I get tunnel vision on the way I advise my customers to build
this area and don't pass it on. This method has been used successfully for quite a
few years now and has been wrinkle free. If it ain't broke, I'm not fixing it.
Problem:
As the fuel vapors evaporate and vents out, it causes cooling in the PTFE fueling
nozzle, the fuel filler tube shrinks and shrinks the fuselage skin along with it.
Epoxy sticks to PTFE extremely well so any movement of the tube is translated
directly to whatever it is attached to, namely the skin. The manual does not imply
that the fuel filler tube should be separated a bit from the fuselage side and only
held by the tapes, and not a floxed corner at the juncture of the filler tube to the
fuselage (after all, we have gotten used to floxed corners). A little slop in the
two glass straps, applied as described in the manual (too briefly), would limit the
distortion. Many of us do not like to have a slightly floating fuel filler neck and
this is the cure used by many of us.
Correction:
If you desire to fix your fuel nozzle, cap, and the filler tube solidly to the
fuselage, the fuselage side must be reinforced. Put a 3/16 to 1/4 inch layer of
blue foam with two layers of bid glass over the foam (similar to the forward wing
support) to stabilize the fuel filler contact area to provide for support and
prevent expansion/contraction skin deformations. The thickness of the foam will
form a more rigid skin that extra glass alone may not correct as the skin is only
1/8 inch thick. Attach the nozzle with straps as described. One at the top, one
near the bottom.
Procedure I use at Custom Flight:
1. Open the hole in the fuselage top to allow the boss from the filler tube to pass
through.
2. Align the fuel filler tube to the fuselage side and temporarily set it against
the side of the aircraft, mark where the fuel tube will set and check that the
rubber fuel hose will fit and not be folded or bent.
3. Cut a piece of scrap blue foam about 1/4 inch thick, and wider than the fuel
tube by about an inch. Set the length from 1 inch minimum below the fuel filler top
hole, and stop near the bottom of the flat part of the PTFE filler tube.
4. Affix the blue foam to the fuselage side with 5 minute floxed epoxy on the top
and bottom edge and floxed Aeropoxy for the center. Clamp as necessary. Allow to
cure.
5. When secure, chamfer the sides to a 45 and round the edges. Spread entirely
with micro slurry and two layers of glass, and peel ply.
6. Refit the tube, mark the top for the filler cap flush with the outer fuselage
and cut and install the filler cap. Check fit. Once fit is acceptable, Redux the
top area around the filler cap inside and out, and affix with glass straps as
described in the manual. Peel ply as you will be working around here later.
7. Once all is secure, attach the trimmed rubber fuel elbow and clamp.
8. Use Pro Seal on just the top and bottom points of the rubber fuel elbow if you
are concerned about fuel leakage in the event of an overfill. Keep in mind, the
fuel tube will have to be cut off to remove it if using Pro Seal (available at A/C
Spruce.).
9. Attach fuel vent tubing as appropriate.
<http://photos.msn.com/Viewing/Album.aspx?PST=8nK2AN1B!1LEiKSdooxx9v4CFFiF2tnPWP2mfc7Vl*tK8zynHq0aFwS7xyuUUORT5dlN4XEFfQoS52BHh7nFQw%24%24>
Bud Yerly
Custom Flight Creations
US Dealer.
----- Original Message -----
From: William McClellan<mailto:wilwood@earthlink.net>
To: enquiries@europa-aircraft.co.uk<mailto:enquiries@europa-aircraft.co.uk>
Cc: Bud<mailto:budyerly@msn.com>
Sent: Thursday, May 13, 2010 12:01 PM
Subject: Fuselage skin distortion at fuel fill
I find only inconclusive information on the forum about fuselage skin distortion
that can develop around the fuel fill tube. I can not find additional
information. Would you steer me to the correct solution or give me any revised
procedure.
Thanks,
Bill McClellan
This MSN Photo E-mail slideshow will be available for 30 days.
To share high quality pictures with your friends and family using MSN Photo E-mail,
join MSN<http://g.msn.com/0PHenus1/29>.
Graham Singleton:
Bud
I see you used plastic tube for the breather. Makes me nervous remembering Harald
Linke's refueling fire. I always use 3/8 versatube and ground it.
Fuel vapour and droplets running up an insulated tube might act like a Van der Graff
generator and cause a spark. My guess anyway.


