Filling and sanding that which will hardly ever be seen.
Date: 10/31/2007
Views: 4143
FWF-10 (9)
Date: 11/29/2009
Views: 6048
Newest Image
EAA SITE
Date: 08/23/2023
Views: 214663
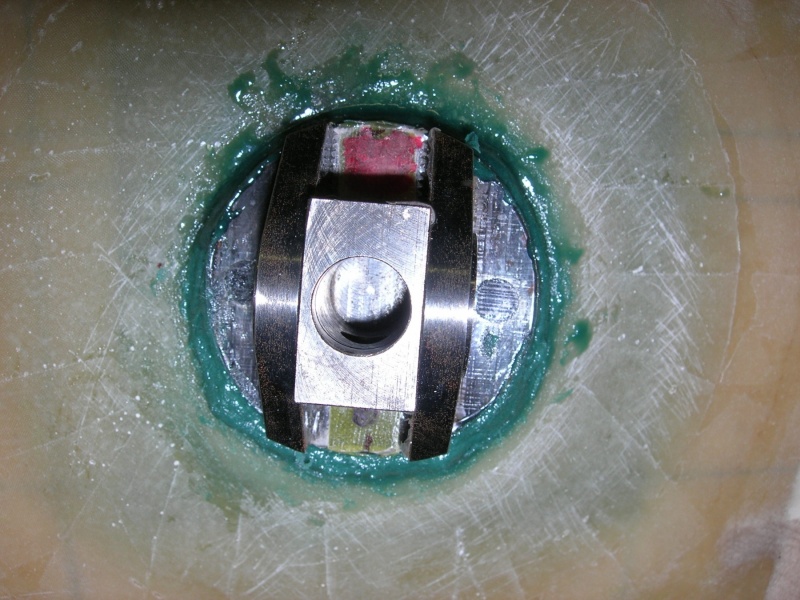
Bonding Port lift pin sockets 18.
I inspected the the Port lift pin socket after bonding, it appears OK.
There was a little excitement when Wayne and I were setting the Port wing after applying the Redux / Flox.
Upon checking with a string, (size E Dacron sewing thread), strung between the wingtips, I noticed the Port wing was swept aft a tiny amount more than it should be. This was after cleaning up much of the Redux ooze out of the socket contact area.
I figured we could correct the aft sweep without disturbing the Redux / Flox too much.
The plan was that I would sweep the Port wing forward a little bit at a time and Wayne would observe how the Port socket to fuse bed of Redux was looking, if it got disturbed too much, I would stop sweeping forward.
The idea was when the gap opened a little between the wood block spacer bonded to the wing and the fuse, (the spacer is there in the first place to prevent over squeezing the Redux / Flox and register the wing with proper sweep), Wayne would insert a thin 1" steel spackle knife as an additional spacer.
OK, Wayne inserted the spackle knife and the aft wing sweep was better.
Then shortly before we were about to cover the wing to insulate the gap with paper towels and leave, Wayne asked if we should be leaving the spackle knife in place?
It ends up he inserted the spackle knife between the Port lift pin socket and fuse right into our beautiful Redux / Flox bed!
This is not too bad. The spackle knife went in only as far as the dime sized G-10 anti squeeze spacer. I had just finished cleaning the spackle knife as I was using the knife to apply Redux / Flox to the sockets.
I swept the Port wing forward and Wayne inserted a mixing stick between the wood spacer bonded to the Port wing and the fuse and he refilled the top side of the contact area with Redux that didn't have any Flox mixed in, (the Redux was getting a little thick from setting).
Then he removed the mixing stick spacer and inserted the spackle knife, (the mixing stick is probably 3 times the thickness of the knife), between the wood spacer and the fuse. We got a good squeeze from the contact area. Upon inspecting the front lift pin contact area, it didn't get disturbed much during this exercise.
You can see in this pict the top of socket is shinier than the bottom, because the second time around top portion was filled with Redux that had no Flox mixed in.
The gap being filled, (not counting the dime sized G-10 .032" thick spacer), between the Port lift pin socket and fuse is perhaps .055" total, (in comparison the starboard side gap was not much more than the .032" thick G-10 dime sized spacer, (.032" plus Redux)).
By using a long AN4 bolt instead of the pip pin on this aft socket, we ended up with a good registration to the ~1/2 circle cutout on the top wingskin that will allow removal of the pip pin. This worked much better having the head of the bolt very close to the cutout instead of using the pip pin, (an odd shape to sight in comparison), that we used on the Starboard side, (we ended up elongating the ~1/2 circle to allow easy pip pin removal because the registration was off slightly, (top of pip pin a little too far aft)).
Y10-10-30


